 |
| Hiroshige, Driving Rain, c. 1840, woodblock (source) |
Tuesday, July 2, 2013
Week #5, Full Share and Tuesday Bi-Weekly Pickups, by Angela

Wednesday, June 26, 2013
Week 4 Tidbits, by Melinda
We're getting some beautiful and unusual produce items this week, some of which may not be familiar to you. Take black raspberries: they're native to North America and are extraordinarily nutritious with very high levels of antioxidants (beside being totally scrumptious). They're available in most places for only about three weeks, so you rarely find them in markets. Such a treat!
While superficially they resemble blackberries, they have a hollow core like red raspberries; blackberries don't have that. They also have slightly less sugar than red raspberries and are slightly smaller. Most people use them to make jams or pies. They also make great ice cream! But vegans, don't despair--for a superb vegan, black-raspberry ice cream, click here.
As well, we're getting that mainstay of greens (practically year-round!), Red Russian kale. And then there's Tatsoi, a beautiful Asian green in the brassica family, along with Tokyo Bekana and Pac Choi. Tatsoi grows in a lovely rosette form, with its short stems and leaves radiating out from a central point. Tatsoi has a very mild flavor and many names: "spinach mustard," "spoon mustard," and "rosette Bok Choi," for starters! Like the other Asian greens we've gotten so far, it has many applications in cooking, from raw in salad, to stir-fried, to sauteed with garlic and lots of other uses!
Another hard-to-find goodie we're getting is "fresh garlic," Basically, that's garlic when the bulb is first pulled up, before it's been allowed to dry to its usual form with the papery skins. It's also called "uncured garlic" (thanks Angela!)
Fresh garlic is considered a real delicacy in Europe, where people are willing to pay several dollars for one head!!!! Because it's so expensive, frugal cooks use every part of it, including the stalk that rises from the head (if it hasn't been cut off) as well as the thick, moist skins that surround the small fresh garlic cloves. (See recipe below.)
 boil, stirring often. Reduce heat to low. Meanwhile, combine baking mix, milk, and remaining sugar in a bowl. Mix until a soft dough forms. Drop dough by spoonfuls onto the berries. Cook over low heat, uncovered, 10 minutes. Cover & cook 10-15 min. more, or until dumplings are cooked through. For a glazed effect, sprinkle the dumplings with additional sugar and a dash of nutmeg before serving. (Click here for source of both photo and recipe)
For another heavenly recipe for garlic bread made with "fresh garlic," click here.
Preparing Beets--If you've never cooked beets from scratch before, there are a few ways to do it (the point is to get the thick, inedible skin off the beet itself). Step one is to cut off any beet greens at the top, leaving about an inch of stem (save the greens to use as cooked greens or in pesto--they're really nutritious and delicious!). Leave the root on the bottom for the time being (see photo

 |
| Black Raspberry (photo source) |
While superficially they resemble blackberries, they have a hollow core like red raspberries; blackberries don't have that. They also have slightly less sugar than red raspberries and are slightly smaller. Most people use them to make jams or pies. They also make great ice cream! But vegans, don't despair--for a superb vegan, black-raspberry ice cream, click here.
As well, we're getting that mainstay of greens (practically year-round!), Red Russian kale. And then there's Tatsoi, a beautiful Asian green in the brassica family, along with Tokyo Bekana and Pac Choi. Tatsoi grows in a lovely rosette form, with its short stems and leaves radiating out from a central point. Tatsoi has a very mild flavor and many names: "spinach mustard," "spoon mustard," and "rosette Bok Choi," for starters! Like the other Asian greens we've gotten so far, it has many applications in cooking, from raw in salad, to stir-fried, to sauteed with garlic and lots of other uses!
 |
| Tatsoi (photo source) |
 |
| Fresh garlic (photo source) |
Fresh garlic is considered a real delicacy in Europe, where people are willing to pay several dollars for one head!!!! Because it's so expensive, frugal cooks use every part of it, including the stalk that rises from the head (if it hasn't been cut off) as well as the thick, moist skins that surround the small fresh garlic cloves. (See recipe below.)
Finally, we're harvesting beets this week, as well as radish greens. Radish greens are a tender but spicy green that makes a great addition to pesto sauces, really bringing a little zing to the party. Of course they also can be steamed, sauteed, stir-fried, etc., like almost all greens.
Black Raspberry Dumplings--This makes 10 servings, so if you have just a pint of black raspberries, feel free to halve the recipe.
- 1 quart fresh or frozen black raspberries
- 1 and 1/4 cups sugar, divided
- 1 cup water
- 3 tbsp cornstarch
- 3 cups prepared baking mix (Bisquick-type)
- 1 cup of milk [or vegan milk substitute]
- additional sugar, optional
- ground nutmeg, optional

For another recipe, click here for "Pine Nut Dumplings in Raspberry Sauce"! (Be still my beating heart!)
Of course people love black raspberry (or red raspberry) jam. If you're feeling adventurous and ready to dive into hot-water-bath canning (it's easy, really!!!), try this simple recipe for canned black raspberry jam (click here). That's from the blog, "Food in Jars," that we follow (see the lower left-hand column on this page). If you're not quite ready for that, try this freezer jam recipe:
Easy Black Raspberry Freezer Jam
Easy Black Raspberry Freezer Jam
- 4 cups crushed berries
- 1 1/2 cups granulated sugar
- 1 (1.59 oz) packet Ball Freezer Jam Fruit Pectin (check store or see here)
To Prepare Tatsoi--If you get a whole head, separate the leaves from each other, then wash. If you get just leaves on stems, you're set to wash them. In either case, wrap washed leaves in toweling in a plastic bag to keep in the fridge a few days.
Tatsoi in Mustard Dressing
For 7 more delicious tatsoi recipes, vegan to omnivore, click here. And for yet another 10 tatsoi recipes, click here!
Finally, for a fabulous sounding recipe for "Tatsoi Panzanella with Spicy Peanut Dressing," click here!
How to Prepare and Use Fresh (or "Uncured") Garlic--
Each garlic head is enclosed on the outside in a thick, ribbed skin. That can be broken open and sliced and used like onions. To then separate the cloves, you must remove the "fleshy, waxy membranes that sheath them" (see photo further up in this post). Separate the cloves from the membranes, but keep it all!!! (See photo below, w/ cloves at left & membranes at right.)
The garlic cloves can be sliced very thinly (they are delicate) & fried in oil till they're golden, then used in various dishes where you would normally use garlic. Or you can use them raw in salads.
Tatsoi in Mustard Dressing
- 12 oz. washed and chopped tatsoi
- 2 medium scallions, chopped
- 2 tbsp lemon juice
- 1 tbsp Dijon mustard (I wouldn't use Trader Joe's brand--it tastes like very hot Chinese mustard)
- 1/4 tsp salt
- 3 tbsp olive oil
- [You might also consider adding a clove or two of thinly sliced fresh garlic]
For 7 more delicious tatsoi recipes, vegan to omnivore, click here. And for yet another 10 tatsoi recipes, click here!
Finally, for a fabulous sounding recipe for "Tatsoi Panzanella with Spicy Peanut Dressing," click here!
How to Prepare and Use Fresh (or "Uncured") Garlic--
Each garlic head is enclosed on the outside in a thick, ribbed skin. That can be broken open and sliced and used like onions. To then separate the cloves, you must remove the "fleshy, waxy membranes that sheath them" (see photo further up in this post). Separate the cloves from the membranes, but keep it all!!! (See photo below, w/ cloves at left & membranes at right.)
 |
| Cloves & membranes (photo source) |
But here's the cool thing! The membranes can be used to make a "cream of garlic"! Here are the instructions:
- Bring water to a simmer in a small pan
- Drop in the membranes, then drain them as soon as the water comes back to simmering
- Let them cool & drain about an hour
- Put them in a food processor along with half their weight in olive oil (i.e., weigh the drained membranes, then measure out half that weight in olive oil)
- Process in food processor till smooth and creamy
- Add salt to taste
- Go straight to heaven when you taste it
 |
| Cream of garlic (source) |
Preparing Beets--If you've never cooked beets from scratch before, there are a few ways to do it (the point is to get the thick, inedible skin off the beet itself). Step one is to cut off any beet greens at the top, leaving about an inch of stem (save the greens to use as cooked greens or in pesto--they're really nutritious and delicious!). Leave the root on the bottom for the time being (see photo
 |
| Trimmed beets (source) |
at left)
The quickest way to cook beets is to trim them as described, then put them in boiling water and cook till you can insert a knife into the beets easily. Remove from stove and cool by running cold water into the pan. Let them sit till they're cool enough to handle, then remove from the pan, cut off the stems (cut just under where the stems attach to the beet), then cut off the root. Now you should be able to peel and/or pull the skin from the beet relatively easily. (If you don't want hot-pink fingertips, you can wear vinyl gloves when peeling or otherwise handling the beets. If you forget the gloves, here are instructions for removing the beet stains with lemon juice: click here.)
Beets can also be steamed in a steamer, following the same directions as for boiling. You lose fewer nutrients if you steam them.
Most people feel that roasting beets is the way to preserve the most flavor and nutrition. But you do heat up your kitchen considerably more than you do with boiling. To roast beets (see source here):

- Trim your beets; meanwhile preheat oven to 400 degrees
- Place samallish beets on large piece of aluminum foil, drizzling a little water or oil on them
- Wrap beets up into a foil packet (large enough to hold them all), crimping the edges of the foil
- Large beets can be wrapped in foil individually
- Place the packet(s) on a baking sheet
- Roast in oven for 50-60 minutes, checking them every twenty minutes or so; if they appear to be scorching, add a little more water or oil
- Small beets will cook more quickly than large ones
- They're done when a knife can be inserted easily into the beets
- To peel, let beets cool till you can handle them
- Holding a beet with a paper towel, use another paper towel to rub the skins off
- If skins don't come off easily, beets may need a bit more cooking
- Beets can be stored in fridge, either whole or sliced, up to a week
- 2 bunches trimmed beets
- 3 tbsp olive oil
- juice of one lemon
- 2 tsp honey
- 1 garlic clove ("fresh garlic"!), minced
- 1 tsp fennel seeds
- 1 tsp caraway seeds
- coarse salt & fresh-ground black pepper
- 4 cups tatsoi (or spinach), divided
- 1 cup fresh parsley leaves, divided
- thinly sliced red onion
 |
| Beets & Greens Salad (source) |
Tuesday, June 25, 2013
Week 4, by Angela
Hello! This is a Full Share and Friday B-Weekly pickup week. Molly will be the farmer in the shareroom.
U-Pick options expand to include raspberries this week, mostly the black raspberries, which comprise one row, and a smattering of red raspberries in the other rows. Regarding U-Pick, I want to make a special note about quantities and containers....
For your menu-planning, your share this week will include Red Russian kale, fresh garlic, Tatsoi, beets, and radish greens.
U-Pick options expand to include raspberries this week, mostly the black raspberries, which comprise one row, and a smattering of red raspberries in the other rows. Regarding U-Pick, I want to make a special note about quantities and containers....
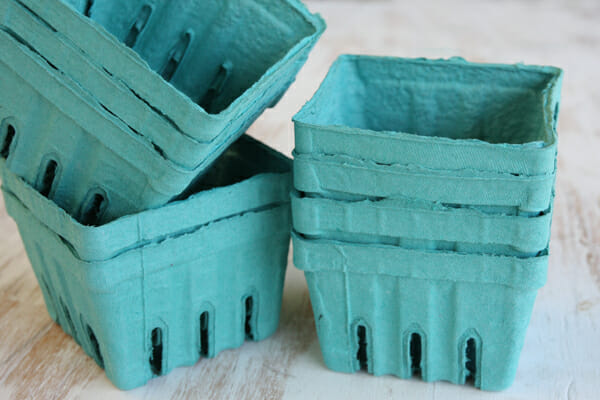 |
| Typical U-Pick boxes, though ours are a little greener |
- Please be sure to take the right amount; if you are uncertain about what a half-pint container looks like, then please refer to the top right of the large whiteboard in the shareroom, or ask a farmer. We may not have enough of the half-pint containers, in which case you may use the pint containers, but only halfway filled. Taking the correct amount is necessary so that all the members of the farm get an equal share.
- Please leave the green containers here at the farm so we can reuse them. You may use them to pick your U-Pick items, then transfer the items to a bag or your own container that you brought with you.
- Farmers will be available if you have questions about this.
For your menu-planning, your share this week will include Red Russian kale, fresh garlic, Tatsoi, beets, and radish greens.
Monday, June 24, 2013
Week Three Photo, and Some U-Pick Ideas, by Angela & Melinda
 |
| Week 3 Pickup |
 |
| Italian Sweet basil at left; Sacred or Tulsi basil at right |
Another U-Pick with uses you may not have thought of is sage. Angela says "fried sage is so crispy delicious on top of eggs or a salad; on low heat, warm olive or coconut oil. Set the sage leaf into the
oil until it turns brown, then remove it & let it cool to a nice crispy garnish." You also can see some recipes below.
 |
| Sage by the barn |
Sage's scientific name is Salvia officinalis, and there are many different varieties. Like other old herbs, sage has or has had many uses, in cuisine, in medicine, and in religions (click here). Its traditional classification in Britain as one of the four essential herbs, along with parsley, rosemary, and thyme, inspired Simon and Garfunkle's famous song, "Scarborough Fair" (click here to listen). If you're interested in historical recipes, click here for late mediaeval "Charmerchande" (a lamb stew with sage and parsley; note that the source, "Gode Cookery," is listed in "My Links" in the upper left column on this page (see here--a wonderful site).
 |
| Nasturtiums in U-Pick--flowers & leaves are edible |
 |
| Calendula (photo source) |
Pasta with Butter, Sage, and Parmesan--by Mark Bittman (see here), 4 servings

- 1 lb cut pasta, like ziti, or flat noodles
- salt & pepper
- 2 tbsp butter
- 30 fresh sage leaves
- 1 cup or more freshly grated parmesan
 |
| Sage & honey skillet cornbread (source) |
- 1 cup cornmeal, preferably whole grain, medium grind
- 1 cup unbleached all-purpose flour
- 1 tbsp baking powder
- 1 tsp salt
- 2 tsp. chopped fresh sage, plus 12 whole fresh sage leaves
- 1 cup whole milk [or vegan substitute]
- 1/2 cup honey
- 1 large egg
- 1/2 cup (1 stick) unsalted butter
Nasturtium Soup--can be made vegan (recipe source)
- 3 leeks, cleaned & sliced thinly
- 5-6 cloves garlic, minced
- 4 tbsp butter or olive oil
- 2 tbsp flour
- 4 cups chicken or veggie broth
- 2 cups water
- 1 cup fresh nasturtium flowers, chopped
- 1 cup fresh nasturtium leaves, chopped
- salt to taste
- 1 tsp. white pepper [or normal pepper if you haven't got white]
- 1 cup heavy cream [vegans substitute 1/2 soy milk & 1/2 soft tofu blended till smooth to make a cup]

For a lovely essay on nasturtiums, their varieties, and uses, see "Renee's Garden: Easy Edible Nasturtiums" (click here).
Friday, June 21, 2013
So, What's Up with Fennel? By Melinda
Fennel (Finocchio in Italian) is a pretty, bulbing plant with stalks above the bulb and delicate fronds on the stalks. It has a somewhat sweet anise or licorice flavor, especially when it's raw. Though it's the bulb that's used most often, you also can use the stalks to make broth, or you can chop them finely & saute with other veggies (stalks are NOT inedible!). The fronds can be chopped and added to salads or used as a garnish on other dishes. I'm thinking of adding some to my next pesto.
The fennel bulb, thinly sliced, is crunchy, a bit sweet, and tastes like anise or licorice, though not as strong as the candy. It's delicious, thinly sliced and raw, in salads. When it's cooked in various preparations, however, the anise taste becomes more mellow and far less pronounced. Still, it brings a richness to dishes that's hard to beat, especially given that it's quite low in calories!
So how do you prepare fennel bulbs? First you cut a small slice off the root end, then slice the whole bulb in half vertically. When you look at the halves, you'll see a triangular core in each half, just above where the root was. With a sharp knife, gently cut out the core in each half, slicing inward from each side of the core toward the center; then remove the core. Then you can either chunk it, slice it, or dice it. See the video below for a demonstration.
 |
| Photo Source |
So how do you prepare fennel bulbs? First you cut a small slice off the root end, then slice the whole bulb in half vertically. When you look at the halves, you'll see a triangular core in each half, just above where the root was. With a sharp knife, gently cut out the core in each half, slicing inward from each side of the core toward the center; then remove the core. Then you can either chunk it, slice it, or dice it. See the video below for a demonstration.
- 4 tbsp olive oil
- 4 fennel bulbs, cut horizontally into 1/3-inch thick slices, fronds reserved
- salt & pepper
- 1/3 cup freshly shredded Parmesan cheese
Carrot Fennel Soup with Parsley Walnut Pesto--vegan
- 2 tbsp olive oil
- 1 medium onions, peeled & chopped
- 1 fennel bulb, cored & thinly sliced, fronds reserved for garnish
- 6 cups veggie broth
- 1 1/2 lbs carrots, peeled [or just scrubbed?--that's what I'd do], sliced in 1/2-in. rounds
- 2 tbsp chopped fresh parsley leaves
- 1 sprig fresh thyme leaves
- 1 tsp [or to taste] salt
- 1 tsp fresh lemon juice or apple-cider vinegar
- fresh ground black pepper, to taste
- cream or milk (cashew, soy, almond, etc.--or dairy if desired) for garnish
- parsley walnut pesto (see below)
 |
| Picture source |
Remove soup from heat & let cool a bit. Use an immersion blender (aka "stick blender" or "boat motor"--see here: it's a really handy, inexpensive device to have) or an upright blender (blend in small amounts) to puree the soup till very smooth. Reheat soup in pot, add pepper and swirls of cream or milk if using. Serve w/ a spoonful of parsley pesto in each bowl. (recipe source)
Parsley Walnut Pesto--makes ~1 cup
- 2 loosely packed cups parsley leaves, rinsed & dried
- salt to taste
- 2 cloves peeled garlic
- 1/2 cup walnuts
- 1/2 cup olive oil, divided
Wednesday, June 19, 2013
Week #2 Pickup, Thoughts and Ideas, by Angela
 |
| Second-Week Share |
 |
| The start of a "three sisters" planting--corn, squash & beans |
 |
| Unhappy lettuces |
 |
| Grass groves next to the tomatoes |
Unintentionally, the tomatoes, peppers, and eggplants have cover crops, between the rows, of some dormant ryegrass seeded far too late last season (see above). As the picture here shows, it's a bit unruly at the moment, but I have a good feeling it'll be under control by the power of the weed- whacker soon.
 |
| Workshares Mary & Sandy washing salad greens |
 |
| Josh washing fennel bulbs |
Subscribe to:
Posts (Atom)